With one example explored, I wanted to put a spin on it – Therefore, I had an idea:
“Can I use eBPF to identify and store the contents of the protocol header for IP packets on a specific interface?”
It’s more of a rhetorical question – of course we can! The code can be found here.
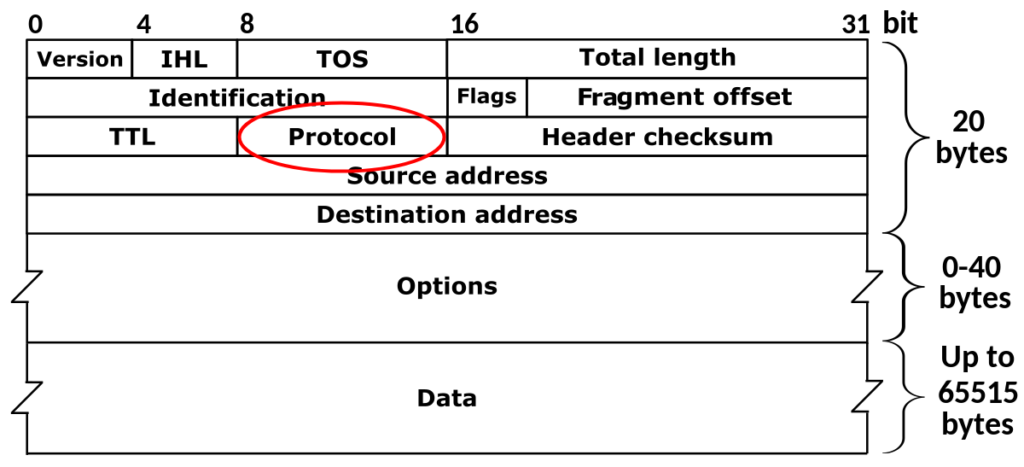
To summarise, the eBPF C program is a little more complicated. It still leverages XDP, however instead of counting the number of packets, it will inspect each IP packet, extract the protocol number, and store it in a map.
#include <linux/bpf.h>
#include <bpf/bpf_helpers.h>
#include <linux/if_ether.h>
#include <linux/ip.h>

struct {
    __uint(type, BPF_MAP_TYPE_ARRAY);
    __type(key, __u32);
    __type(value, __u64);
    __uint(max_entries, 255);
} protocol_count SEC(".maps");


SEC("xdp")
int get_packet_protocol(struct xdp_md *ctx) {
    void *data_end = (void *)(long)ctx->data_end;
    void *data = (void *)(long)ctx->data;

    // Parse Ethernet header
    struct ethhdr *eth = data;
    if ((void *)(eth + 1) > data_end) {
        return XDP_PASS;
    }

    // Check if the packet is an IP packet
    if (eth->h_proto != __constant_htons(ETH_P_IP)) {
        return XDP_PASS;
    }

    // Parse IP header
    struct iphdr *ip = data + sizeof(struct ethhdr);
    if ((void *)(ip + 1) > data_end) {
        return XDP_PASS;
    }

    __u32 key = ip->protocol; // Using IP protocol as the key
    __u64 *count = bpf_map_lookup_elem(&protocol_count, &key);
    if (count) {
        __sync_fetch_and_add(count, 1);
    }

    return XDP_PASS;
}
The Go application is over 100 lines, therefore for brevity, it can be viewed here.
The eBPF map to store this could be visualised as:
Where the Key represents the IP protocol number and value counting the number of instances.
The Go application leverages a helper function to map the protocol number to name in stdout.
Running the application probes the map and outputs non-zero values and their corresponding key. It can be easily tested by running the app and generating traffic. Note how after executing ping the map updates with ICMP traffic.
Preamble: In preparation for writing this I looked at some excellent content created by Liz Rice and Daniel Finneran – including videos, code and literature. I highly recommend checking out their work.
The Cilium eBPF documentation has some excellent examples of getting started with eBPF and Go. As a “hobbyist” programmer, I wanted to cement some of these concepts by digging deeper into one of the examples. Part of my learning style is to compile my own notes on a given topic, and this post is essentially that.
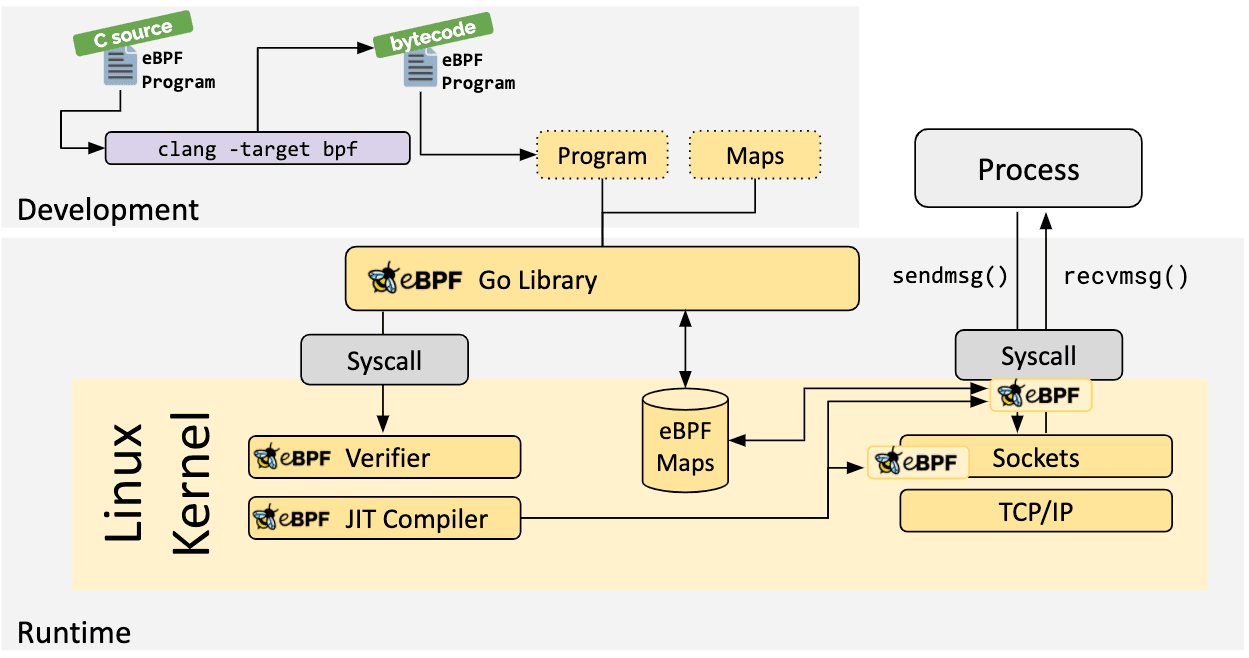
I’ve split this post into three sections – This (the first) covers compiling the C portion of an app to eBPF bytecode, the second part creating the complementary userspace application (in Go) that loads this eBPF program, in conjunction with interacting with a shared map. Lastly, a slightly different application digging a bit deeper into packet processing.
Which map type used will influence its structure. As such, different map types are more suited for storing certain types of information.
As per the kernel docs, the key is an unsigned 32-bit integer.
value can be of any size. For this example, we use an unsigned 64-bit integer. We’re only counting a single, specific metric, therefore we can limit this map to a single index.
At the end of the struct, we define:
pkt_count SEC(".maps");
pkt_count is the name of the structure that defines the eBPF map. This name is used as a reference in the eBPF program to interact with it, such as retrieving information.
SEC(".maps"); Is a Macro used to define a section name for the given object in the resulting ELF file. This instructs the compiler to include the pkt_count structure to be placed in the ELF section called .maps
SEC("xdp")
int count_packets() {
}
The SEC("xdp") macro specifies that the function proceeding it (count_packets) is to be placed in the ELF section named xdp. This is effectively associating our code to a specific kernel hook.
This ELF section is used by the eBPF loader to recognise that this function is an XDP eBPF program. There are other program types other than XDP, for example, Kprobe, Uprobe, Tracepoint. Which we choose depends on what we want to accomplish. XDP is predominantly used with high-performance packet processing, and as we’re counting the number of packets, it’s ideal for this use case.
__u32 key = 0; defines a local variable of key that we use to access the eBPF map entry. As our map only has 1 entry, we know we can reference this with a value of 0.
__u64 *count = bpf_map_lookup_elem(&pkt_count, &key); looks up an element in the pkt count map using the specified key. We’ll need this so we can increment it, which we do with:
   if (count) {
        __sync_fetch_and_add(count, 1);
    }

    return XDP_PASS;
Why use __sync_fetch_and_add instead of standard incrementing?
In high-throughput environments like network packet processing, we often have multiple execution contexts (like different CPU cores) that might access and update eBPF maps concurrently. Therefore, we need to ensure atomic operations on these structures for correctness and prevent data races.
Lastly, we return an integer value from the xdp_action enum, in this case a pass, but we could return other values:
In Part 1, we had a look at creating the eBPF program in C, which we will need to compile into eBPF bytecode and inject into our Go application
Rather than copy/paste the exact instructions, the ebpf-go documentation outlines the process in the toolchain to create the scaffolding for the Go application.
package main

import (
    "log"
    "net"
    "os"
    "os/signal"
    "time"

    "github.com/cilium/ebpf/link"
    "github.com/cilium/ebpf/rlimit"
)

func main() {
    // Remove resource limits for kernels <5.11.
    if err := rlimit.RemoveMemlock(); err != nil {
        log.Fatal("Removing memlock:", err)
    }

    // Load the compiled eBPF ELF and load it into the kernel.
    var objs counterObjects
    if err := loadCounterObjects(&objs, nil); err != nil {
        log.Fatal("Loading eBPF objects:", err)
    }
    defer objs.Close()

    ifname := "eth0" // Change this to an interface on your machine.
    iface, err := net.InterfaceByName(ifname)
    if err != nil {
        log.Fatalf("Getting interface %s: %s", ifname, err)
    }

    // Attach count_packets to the network interface.
    link, err := link.AttachXDP(link.XDPOptions{
        Program:   objs.CountPackets,
        Interface: iface.Index,
    })
    if err != nil {
        log.Fatal("Attaching XDP:", err)
    }
    defer link.Close()

    log.Printf("Counting incoming packets on %s..", ifname)

    // Periodically fetch the packet counter from PktCount,
    // exit the program when interrupted.
    tick := time.Tick(time.Second)
    stop := make(chan os.Signal, 5)
    signal.Notify(stop, os.Interrupt)
    for {
        select {
        case <-tick:
            var count uint64
            err := objs.PktCount.Lookup(uint32(0), &count)
            if err != nil {
                log.Fatal("Map lookup:", err)
            }
            log.Printf("Received %d packets", count)
        case <-stop:
            log.Print("Received signal, exiting..")
            return
        }
    }
}
As there’s already an example, let’s dig into the prominent sections:
    // Load the compiled eBPF ELF and load it into the kernel.
    var objs counterObjects
    if err := loadCounterObjects(&objs, nil); err != nil {
        log.Fatal("Loading eBPF objects:", err)
    }
    defer objs.Close()

    ifname := "eth0" // Change this to an interface on your machine.
    iface, err := net.InterfaceByName(ifname)
    if err != nil {
        log.Fatalf("Getting interface %s: %s", ifname, err)
    }

    // Attach count_packets to the network interface.
    link, err := link.AttachXDP(link.XDPOptions{
        Program:   objs.CountPackets,
        Interface: iface.Index,
    })
    if err != nil {
        log.Fatal("Attaching XDP:", err)
    }
    defer link.Close()
counterObjects : This is a struct type generated by running bpf2go, representing our compiled eBPF ELF.
loadCounterObjects() : Attempts to load the eBPF object, and captures an error if it cannot do so.
defer objs.Close() : Ensure proper cleanup of any resources associated with the loaded eBPF objects on exit. This is a common practice to prevent resource leaks.
link.AttachXDP: This function call is used to attach an XDP program to a specific network device. The Program being our C-based eBPF Program we defined as CountPackets:
// From counter.c

SEC("xdp")
int count_packets() {
Finally, we need a way of fetching data from the eBPF map storing our Packet counter:
  // Periodically fetch the packet counter from PktCount,
    // exit the program when interrupted.
    tick := time.Tick(time.Second)
    stop := make(chan os.Signal, 5)
    signal.Notify(stop, os.Interrupt)
    for {
        select {
        case <-tick:
            var count uint64
            err := objs.PktCount.Lookup(uint32(0), &count)
            if err != nil {
                log.Fatal("Map lookup:", err)
            }
            log.Printf("Received %d packets", count)
        case <-stop:
            log.Print("Received signal, exiting..")
            return
        }
    }
Here, we leverage two channels, one that will loop indefinitely, printing out the value in the first index of the map, (the packet counter) and a second channel that will quit the application in the event of a termination signal from the Operating System.