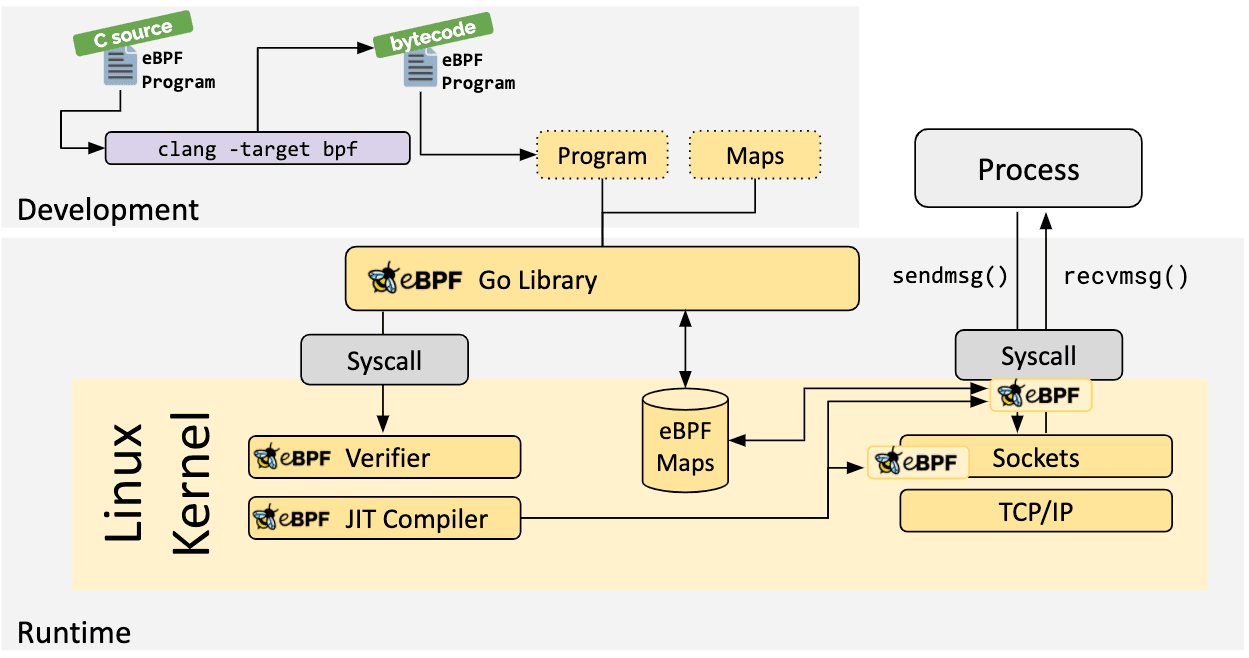
Virtual Thoughts

Virtualisation, Storage and various other ramblings.

Page 4 of 24

Debugging cloud-init not executing runcmd commands

Background

Rancher leverages cloud-init for the provisioning of Virtual Machines on a number of infrastructure providers, as below:

I recently encountered an issue whereby vSphere based clusters using an Ubuntu VM template would successfully provision, but SLES based VM templates would not.

What does Rancher use cloud-init for?

This is covered in the Masterclass session I co-hosted, but as a refresher, particularly with the vSphere driver, Rancher will mount an ISO image to the VM to deliver the user-data portion of a cloud-init configuration. The contents of which look like this:

#cloud-config
groups:
- staff
hostname: scale-aio-472516f5-s82pz
runcmd:
- sh /usr/local/custom_script/install.sh
set_hostname:
- scale-aio-472516f5-s82pz
users:
- create_groups: false
  groups: staff
  lock_passwd: true
  name: docker
  no_user_group: true
  ssh_authorized_keys:
  - |
    ssh-rsa AAAAB3NzaC1yc.......
  sudo: ALL=(ALL) NOPASSWD:ALL
write_files:
- content: H4sIAAAAAAAA/wAAA...........
  encoding: gzip+b64
  path: /usr/local/custom_script/install.sh
  permissions: "0644"

Note: This is automatically generated, any additional cloud-init config you include in the cluster configuration (below) gets merged with the above.

It saves a script with write_files and then runs this with runcmd – this will install the rancher-system-agent service and begin the process of installing RKE2/K3s.

The Issue

When I provisioned SLES based clusters using my existing Packer template, Rancher would indicate it was waiting for the agent to check in:

Investigating

Thinking cloud-init didn’t ingest the config, I ssh’d into the node to do some debugging. I noticed that the node name had changed:

sles-15-sp3-pool1-15a47a8f-xcspb:~ #

Which I verified with:

sles-15-sp3-pool1-15a47a8f-xcspb:/ # cat /var/lib/cloud/instance/user-data.txt | grep hostname
hostname: sles-15-sp3-pool1-15a47a8f-xcspb

Inspecting user-data.txt from that directory also matched what was in the mounted ISO. I could also see /usr/local/custom_script/install.sh was created, but nothing indicated that it was executed. It appeared everything else from the cloud-init file was processed – SSH keys, groups, writing the script, etc, but nothing from runcmd was executed.

I ruled out the script by creating a new cluster and adding my own command:

As expected, this was merged into the user-data.iso file mounted to the VM, but /tmp/test.txt didn’t exist, so it was never executed.

Checking cloud-init logs

Cloud-Init has an easy way to collect logs – the cloud-init collect-logs command, This will generate a tarball:

sles-15-sp3-pool1-15a47a8f-xcspb:/ # cloud-init collect-logs
Wrote /cloud-init.tar.gz

I noted in cloud-init.log I could see the script file being saved:

2023-01-18 09:56:22,917 - helpers.py[DEBUG]: Running config-write-files using lock (<FileLock using file '/var/lib/cloud/instances/nocloud/sem/config_write_files'>)
2023-01-18 09:56:22,927 - util.py[DEBUG]: Writing to /usr/local/custom_script/install.sh - wb: [644] 29800 bytes
2023-01-18 09:56:22,928 - util.py[DEBUG]: Changing the ownership of /usr/local/custom_script/install.sh to 0:0

But nothing indicating it was executed.

I decided to extrapolate a list of all the cloud-init modules that were initiated:

cat cloud-init.log | grep "Running module"

stages.py[DEBUG]: Running module migrator
stages.py[DEBUG]: Running module seed_random 
stages.py[DEBUG]: Running module bootcmd 
stages.py[DEBUG]: Running module write-files 
stages.py[DEBUG]: Running module growpart 
stages.py[DEBUG]: Running module resizefs 
stages.py[DEBUG]: Running module disk_setup
stages.py[DEBUG]: Running module mounts 
stages.py[DEBUG]: Running module set_hostname
stages.py[DEBUG]: Running module update_hostname 
stages.py[DEBUG]: Running module update_etc_hosts 
stages.py[DEBUG]: Running module rsyslog 
stages.py[DEBUG]: Running module users-groups 
stages.py[DEBUG]: Running module ssh

But still, no sign of runcmd.

Checking cloud-init configuration

Outside of the log bundle, /etc/cloud/cloud.cfg includes the configuration for cloud-init. having suspected the runcmd module may not be loaded, I checked, but it was present:

# The modules that run in the 'config' stage
cloud_config_modules:
 - ssh-import-id
 - locale
 - set-passwords
 - zypper-add-repo
 - ntp
 - timezone
 - disable-ec2-metadata
 - runcmd

However, I noticed that nothing from the cloud_config_modules block was mentioned in cloud-init.log. However, everything from cloud_init_modules was:

# The modules that run in the 'init' stage
cloud_init_modules:
 - migrator
 - seed_random
 - bootcmd
 - write-files
 - growpart
 - resizefs
 - disk_setup
 - mounts
 - set_hostname
 - update_hostname
 - update_etc_hosts
 - ca-certs
 - rsyslog
 - users-groups
 - ssh

So, it appeared the entire cloud_config_modules step wasn’t running. Weird.

Fixing

After speaking with someone from the cloud-init community, I found out that there are several cloud-init services that exist on a host machine. Each dedicated to a specific step.

Default config on SLES 15 SP4 machine:

sles-15-sp3-pool1-15a47a8f-xcspb:/ # sudo systemctl list-unit-files | grep cloud
cloud-config.service                    disabled        disabled     
cloud-final.service                     disabled        disabled     
cloud-init-local.service                disabled        disabled     
cloud-init.service                      enabled         disabled     
cloud-config.target                     static          -            
cloud-init.target                       enabled-runtime disabled

Default config on a Ubuntu 22.04 machine:

packerbuilt@SRV-RNC-1:~$ sudo systemctl list-unit-files | grep cloud
cloud-config.service                        enabled         enabled
cloud-final.service                         enabled         enabled
cloud-init-hotplugd.service                 static          -
cloud-init-local.service                    enabled         enabled
cloud-init.service                          enabled         enabled
cloud-init-hotplugd.socket                  enabled         enabled
cloud-config.target                         static          -
cloud-init.target                           enabled-runtime enabled

The cloud-config service was not enabled and therefore would not run any of the related modules. To rectify, I added the following to my Packer script when building the template:

# Ensure cloud-init services are enabled
systemctl enable cloud-init.service
systemctl enable cloud-init-local.server
systemctl enable cloud-config.service
systemctl enable cloud-final.service

After which, provisioning SLES based machines from Rancher worked.

Installing & Using the Nvidia GPU Operator in K3s with Rancher

This post outlines the necessary steps to leverage the Nvidia GPU operator in a K3s cluster. In this example, using a gift from me to my homelab, a cheap Nvidia T400 GPU which is on the supported list for the operator.

Step 1 – Configure Passthrough (If required)

For this environment, vSphere is used and therefore PCI Passthrough is required to present the GPU to the VM. The Nvidia GPU is represented as two devices – one for the video controller, and another for the audio controller – we only need the video controller. Steps after this are still relevant to bare metal deployments.

Step 2 – Create VM

When creating a VM, choose to add a PCI device, and specify the Nvidia GPU:

Step 3 – Install nvidia-container-runtime and K3s

In order for Containerd (within K3s) to pick up the Nvidia plugin when K3s starts, we need to install the corresponding container runtime:

root@ubuntu:~# curl -s -L https://nvidia.github.io/nvidia-container-runtime/gpgkey |   sudo apt-key add -
root@ubuntu:~# distribution=$(. /etc/os-release;echo $ID$VERSION_ID)
root@ubuntu:~# curl -s -L https://nvidia.github.io/nvidia-container-runtime/$distribution/nvidia-container-runtime.list |   sudo tee /etc/apt/sources.list.d/nvidia-container-runtime.list
root@ubuntu:~# apt update && apt install -y nvidia-container-runtime

root@ubuntu:~# curl -sfL https://get.k3s.io | INSTALL_K3S_VERSION="v1.23.7+k3s1" sh

We can validate the Containerd config includes the Nvidia plugin with:

root@ubuntu:~# cat /var/lib/rancher/k3s/agent/etc/containerd/config.toml | grep -i nvidia
[plugins.cri.containerd.runtimes."nvidia"]
[plugins.cri.containerd.runtimes."nvidia".options]
  BinaryName = "/usr/bin/nvidia-container-runtime"

Step 4 – Import Cluster into Rancher and install the nvidia-gpu-operator

Follow this guide to import an existing cluster in Rancher.

After which, Navigate to Rancher -> Cluster -> Apps -> Repositories -> Create

Add the Helm chart for the Nvidia GPU operator:

Select to install the GPU Operator chart by going to Cluster -> Apps -> Charts -> Search for "GPU":

Follow the instructions until you reach the Edit YAML section. At this point add the following configuration into the corresponding section; this is to cater to where K3s stores the Containerd config and socket endpoint:

toolkit:
  env:
    - name: CONTAINERD_CONFIG
      value: /var/lib/rancher/k3s/agent/etc/containerd/config.toml
    - name: CONTAINERD_SOCKET
      value: /run/k3s/containerd/containerd.sock

Proceed with the installation and wait for the corresponding Pods to spin up. This will take some time as it’s compiling the GPU/CUDA drivers on the fly.

Note: You will notice several GPU-Operator Pods initially in a crashloop state. This is expected until the nvidia-driver-daemonset Pod has finished building and installing the Nvidia drivers. You can follow the Pod logs to get more insight as to what’s occurring.

oot@ubuntu:~# kubectl logs nvidia-driver-daemonset-wmrxq
DRIVER_ARCH is x86_64
Creating directory NVIDIA-Linux-x86_64-515.65.01
Verifying archive integrity... OK
root@ubuntu:~# kubectl logs nvidia-driver-daemonset-wmrxq -f
DRIVER_ARCH is x86_64
Creating directory NVIDIA-Linux-x86_64-515.65.01
Verifying archive integrity... OK
Uncompressing NVIDIA Accelerated Graphics Driver for Linux-x86_64 515.65.01............................................................................................................................................
root@ubuntu:~# kubectl get po
NAME                                                              READY   STATUS            RESTARTS      AGE
nvidia-dcgm-exporter-dkcz9                                        0/1     PodInitializing   0             4m42s
gpu-operator-v22-1669053133-node-feature-discovery-master-t4mrp   1/1     Running           0             6m26s
gpu-operator-v22-1669053133-node-feature-discovery-worker-rxxw5   1/1     Running           1 (91s ago)   6m1s
gpu-operator-8488c86579-gf7z8                                     1/1     Running           1 (10m ago)   30m
nvidia-container-toolkit-daemonset-mgn92                          1/1     Running           0             5m59s
nvidia-driver-daemonset-46sdp                                     1/1     Running           0             5m55s
nvidia-cuda-validator-cmt7x                                       0/1     Completed         0             74s
gpu-feature-discovery-4xw2q                                       1/1     Running           0             4m23s
nvidia-device-plugin-daemonset-8czgl                              1/1     Running           0             5m
nvidia-device-plugin-validator-tzpq8                              0/1     Completed         0             37s

Step 5 – Validate and Test

First, check to see the runtimeClass is present:

root@ubuntu:~# kubectl get runtimeclass
NAME     HANDLER   AGE
nvidia   nvidia    30m

kubectl describe node should also list a GPU under the Allocatable resources:

Allocatable:
  cpu:                8
  ephemeral-storage:  49893476109
  hugepages-1Gi:      0
  hugepages-2Mi:      0
  memory:             16384596Ki
  nvidia.com/gpu:     1

We can use the following workload to test. Note the runtimeClassName reference in the Pod spec:

 cat << EOF | kubectl create -f -
apiVersion: v1
kind: Pod
metadata:
  name: cuda-vectoradd
spec:
  restartPolicy: OnFailure
  runtimeClassName: nvidia
  containers:
  - name: cuda-vectoradd
    image: "nvidia/samples:vectoradd-cuda11.2.1"
    resources:
      limits:
         nvidia.com/gpu: 1
EOF

Logs from the Pod will indicate if it was successful:

root@ubuntu:~# kubectl logs cuda-vectoradd
[Vector addition of 50000 elements]
Copy input data from the host memory to the CUDA device
CUDA kernel launch with 196 blocks of 256 threads
Copy output data from the CUDA device to the host memory
Test PASSED

Without providing the runtimeClassName in the spec the Pod will error:

root@ubuntu:~# kubectl logs cuda-vectoradd
[Vector addition of 50000 elements]
Failed to allocate device vector A (error code CUDA driver version is insufficient for CUDA runtime version)!

Using the NSX-T CNI with RKE2

This post outlines the necessary steps to leverage the VMware NSX-T CNI with RKE2

1. Planning

The following illustrates my Lab environment with a single node cluster:

General Considerations

If you have a new NSX-T environment, ensure you have (as a minimum) the following:

  • T0 Router
  • T1 Router
  • Edge Cluster
  • VLAN Transport Zone
  • Overlay Transport Zone
  • Route advertisement (BGP/OSPF) to the physical network

NSX Specific Considerations

  • A network segment (or vds port) for management traffic (NS-K8S-MGMT in this example)
  • A network segment for overlay traffic (NS-K8S-OVERLAY)

Management traffic should be put on a routed network
Overlay traffic does not have to be on a routed network

You will need to acquire and upload the ncp container image to a private repo:

This will contain the NCP image

2. Prepare NSX Objects

  • Create and retrieve the object ID’s for:
  • An IP Block for the Pods (this /16 will be divided into /24’s in our cluster)
  • An IP Pool for loadBalancer service types

3. Create VM

  • Create a VM with one nic attached to the Management network, and one attached to the Overlay network. Note, for ease you can configure NSX-T to provide DHCP services to both
  • Ensure Python is Installed (aka Python2)

4. Install RKE2

  • Create the following configuration file to instruct RKE2 not to auto-apply a CNI:
packerbuilt@k8s-test-node:~$ cat /etc/rancher/rke2/config.yaml 
cni:
  - none
  • Install RKE2
curl -sfL https://get.rke2.io | sh -
systemctl enable rke2-server.service
systemctl start rke2-server.service
# Wait a bit
export KUBECONFIG=/etc/rancher/rke2/rke2.yaml PATH=$PATH:/var/lib/rancher/rke2/bin
kubectl get nodes
  • You will notice some pods are in pending state – this is normal as these reside outside of the host networking namespace and we have yet to install a CNI

5. Install additional CNI binaries

  • NSX-T also requires access to the portmap CNI binary. this can be acquired by:
wget https://github.com/containernetworking/plugins/releases/download/v1.1.1/cni-plugins-linux-amd64-v1.1.1.tgz
  • Extract the contents to /opt/cni/bin/

6. Tag the overlay network port on the VM

The NSX-T container plugin needs to identify the port used for container traffic. In the example above, this is the interface connection to our Overlay switch

img_1.png
  • In NSX-T navigate to Inventory -> Virtual Machines -> Select the VM
  • Select the port that’s connected to the overlay switch
  • Add the tags as appropriate

7. Download the NCP operator files

  • git clone https://github.com/vmware/nsx-container-plugin-operator
  • Change directory – cd /deploy/kubernetes/

8. Change the Operator yaml

  • Operator.yaml – replace where the image resides in your environment. Example:
            - name: NCP_IMAGE
              value: "core.harbor.virtualthoughts.co.uk/library/nsx-ncp-ubuntu:latest"

9. Change the Configmap yaml file

Which values to change will depend on your deployment topology, but as an example:

@@ -11,7 +11,7 @@ data:
 
     # If set to true, the logging level will be set to DEBUG instead of the
     # default INFO level.
-    #debug = False
+    debug = True


@@ -52,10 +52,10 @@ data:
     [coe]
 
     # Container orchestrator adaptor to plug in.
-    #adaptor = kubernetes
+    adaptor = kubernetes
 
     # Specify cluster for adaptor.
-    #cluster = k8scluster
+    cluster = k8scluster-lspfd2
 
     # Log level for NCP modules (controllers, services, etc.). Ignored if debug
     # is True
@@ -111,10 +111,10 @@ data:
     [k8s]
 
     # Kubernetes API server IP address.
-    #apiserver_host_ip = <None>
+    apiserver_host_ip = 172.16.100.13
 
     # Kubernetes API server port.
-    #apiserver_host_port = <None>
+    apiserver_host_port = 6443
 
     # Full path of the Token file to use for authenticating with the k8s API
     # server.
@@ -129,7 +129,7 @@ data:
     # Specify whether ingress controllers are expected to be deployed in
     # hostnework mode or as regular pods externally accessed via NAT
     # Choices: hostnetwork nat
-    #ingress_mode = hostnetwork
+    ingress_mode = nat
 
     # Log level for the kubernetes adaptor. Ignored if debug is True
     # Choices: NOTSET DEBUG INFO WARNING ERROR CRITICAL
@@ -254,7 +254,7 @@ data:
 
 
     # The OVS uplink OpenFlow port where to apply the NAT rules to.
-    #ovs_uplink_port = <None>
+    ovs_uplink_port = ens224
 
     # Set this to True if you want to install and use the NSX-OVS kernel
     # module. If the host OS is supported, it will be installed by nsx-ncp-
@@ -318,8 +318,11 @@ data:
     # [<scheme>://]<ip_adress>[:<port>]
     # If scheme is not provided https is used. If port is not provided port 80
     # is used for http and port 443 for https.
-    #nsx_api_managers = []
-
+    nsx_api_managers = 172.16.10.43
+    nsx_api_user = admin
+    nsx_api_password = SuperSecretPassword123!
+    insecure = true
+    
     # If True, skip fatal errors when no endpoint in the NSX management cluster
     # is available to serve a request, and retry the request instead
     #cluster_unavailable_retry = False
@@ -438,7 +441,7 @@ data:
     # support automatically creating the IP blocks. The definition is a comma
     # separated list: CIDR,CIDR,... Mixing different formats (e.g. UUID,CIDR)
     # is not supported.
-    #container_ip_blocks = []
+    container_ip_blocks = IB-K8S-PODS 
 
     # Resource ID of the container ip blocks that will be used for creating
     # subnets for no-SNAT projects. If specified, no-SNAT projects will use
@@ -451,7 +454,7 @@ data:
     # creating the ip pools. The definition is a comma separated list:
     # CIDR,IP_1-IP_2,... Mixing different formats (e.g. UUID, CIDR&IP_Range) is
     # not supported.
-    #external_ip_pools = []
+    external_ip_pools = IP-K8S-LB


@@ -461,7 +464,7 @@ data:
     # Name or ID of the top-tier router for the container cluster network,
     # which could be either tier0 or tier1. If policy_nsxapi is enabled, should
     # be ID of a tier0/tier1 gateway.
-    #top_tier_router = <None>
+    top_tier_router = T0
 
     # Option to use single-tier router for the container cluster network
     #single_tier_topology = False
@@ -472,13 +475,13 @@ data:
     # policy_nsxapi is enabled, it also supports automatically creating the ip
     # pools. The definition is a comma separated list: CIDR,IP_1-IP_2,...
     # Mixing different formats (e.g. UUID, CIDR&IP_Range) is not supported.
-    #external_ip_pools_lb = []
+    #external_ip_pools_lb = IP-K8S-LB
 
     # Name or ID of the NSX overlay transport zone that will be used for
     # creating logical switches for container networking. It must refer to an
     # already existing resource on NSX and every transport node where VMs
     # hosting containers are deployed must be enabled on this transport zone
-    #overlay_tz = <None>
+    overlay_tz = nsx-overlay-transportzone
 
 
     # Resource ID of the lb service that can be attached by virtual servers
@@ -500,11 +503,11 @@ data:
 
     # Resource ID of the firewall section that will be used to create firewall
     # sections below this mark section
-    #top_firewall_section_marker = <None>
+    top_firewall_section_marker = 0eee3920-1584-4c54-9724-4dd8e1245378
 
     # Resource ID of the firewall section that will be used to create firewall
     # sections above this mark section
-    #bottom_firewall_section_marker = <None>
+    bottom_firewall_section_marker = 3d67b13c-294e-4470-95db-7376cc0ee079


@@ -523,7 +526,7 @@ data:
 
     # Edge cluster ID needed when creating Tier1 router for loadbalancer
     # service. Information could be retrieved from Tier0 router
-    #edge_cluster = <None>
+    edge_cluster = 726530a3-a488-44d5-aea6-7ee21d178fbc

10. Apply the manifest files

kubectl apply -f /nsx-container-plugin-operator/deploy/kubernetes/*

You should see both the operator and NCP workloads manifest

root@k8s-test-node:/home/packerbuilt/nsx-container-plugin-operator/deploy/kubernetes# kubectl get po -n nsx-system
NAME                       READY   STATUS    RESTARTS   AGE
nsx-ncp-5666788456-r4nzb   1/1     Running   0          4h31m
nsx-ncp-bootstrap-6rncw    1/1     Running   0          4h31m
nsx-node-agent-6rstw       3/3     Running   0          4h31m
root@k8s-test-node:/home/packerbuilt/nsx-container-plugin-operator/deploy/kubernetes# kubectl get po -n nsx-system-operator
NAME                               READY   STATUS    RESTARTS   AGE
nsx-ncp-operator-cbcd844d4-tn4pm   1/1     Running   0          4h31m

Pods should be transitioning to running state, and loadbalancer services will be facilitated by NSX

root@k8s-test-node:/home/packerbuilt/nsx-container-plugin-operator/deploy/kubernetes# kubectl get svc
NAME            TYPE           CLUSTER-IP     EXTERNAL-IP     PORT(S)        AGE
kubernetes      ClusterIP      10.43.0.1      <none>          443/TCP        4h34m
nginx-service   LoadBalancer   10.43.234.41   172.16.102.24   80:31848/TCP   107m
root@k8s-test-node:/home/packerbuilt/nsx-container-plugin-operator/deploy/kubernetes# curl 172.16.102.24
<!DOCTYPE html>
<html>
<head>
<title>Welcome to nginx!</title>
<style>
    body {
      ......
    }

The end result is a topology where every namespace has its own T1 router, advertised to T0:

« Older posts Newer posts »

© 2024 Virtual Thoughts

Theme by Anders NorenUp ↑

Social media & sharing icons powered by UltimatelySocial
RSS
Twitter
Visit Us
Follow Me