Edit: This post has been updated to reflect changes in newer versions of Rancher.
Note: As mentioned by Jonathan in the comments, disabling cloud-init’s initial network configuration is recommended. To do this, create a file:
/etc/cloud/cloud.cfg.d/99-disable-network-config.cfg
To contain:
network: {config: disabled}
In your VM template.
How networking configuration is applied to k8s nodes (or VM’s in general) in on-premises environments is usually achieved by one of two ways – DHCP or static. For some, DHCP is not a popular option and static addresses can be time-consuming to manage, particularly when there’s no IPAM feature in Rancher. In this blog post I go through how to leverage vSphere Network Protocol Profiles in conjunction with Rancher and Cloud-Init to reliably, and predictably apply static IP addresses to deployed nodes.
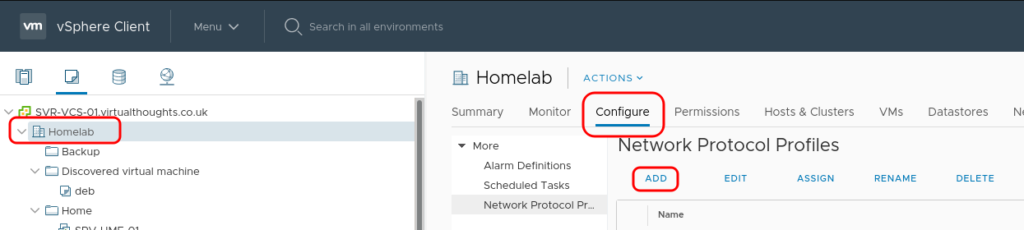
Create the vSphere Network Protocol Profile
Navigate to Datacenter > Configure > Network Protocol Profiles. and click “Add”.
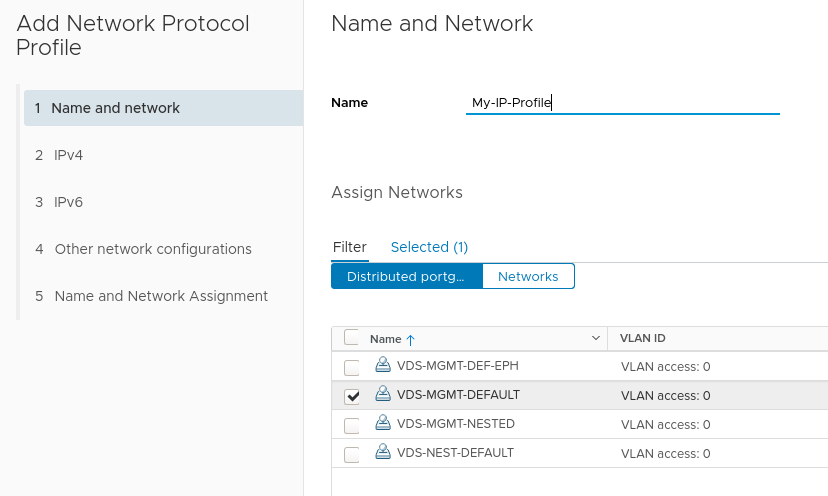
Provide a name for the profile and assign it to one, or a number of port groups.
Next define the network parameters for this port group. The IP Pool and IP Pool Range are of particular importance here – we will use this pool of addresses to assign to our Rancher deployed K8s nodes.
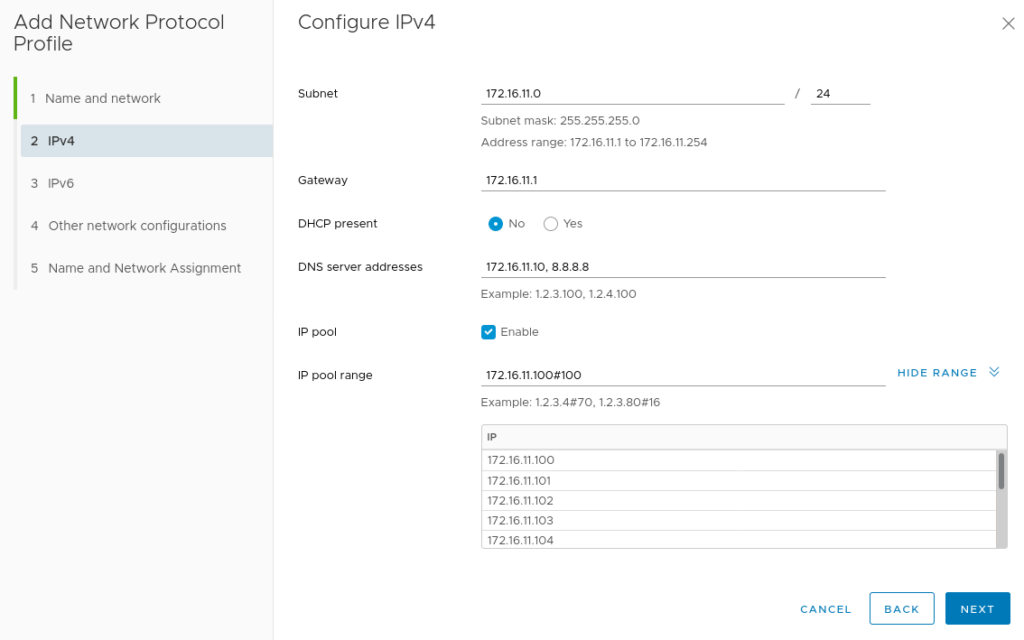
After adding any other network configuration items the profile will be created and associated with the previously specified port group.
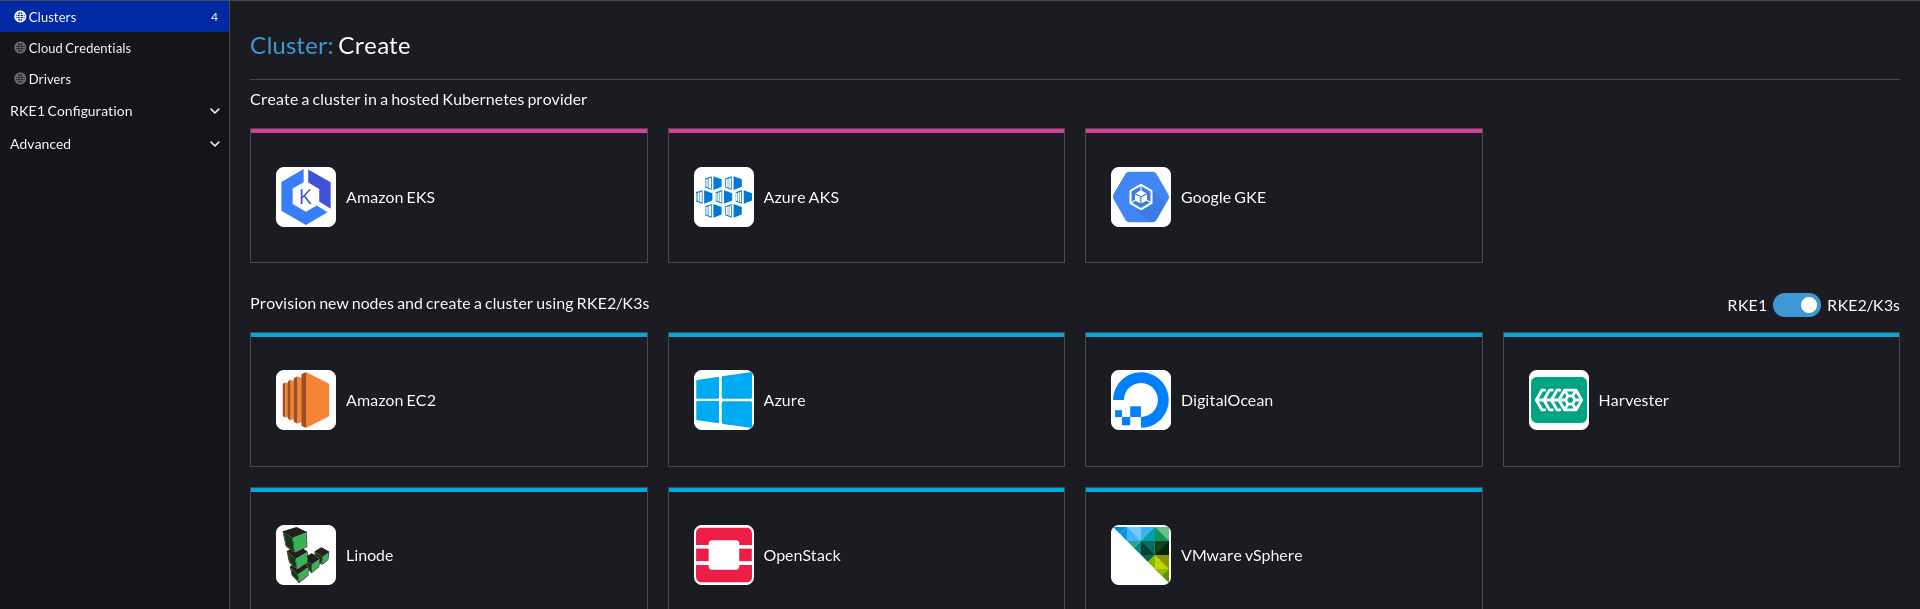
Create a cluster
In Rancher, navigate to Cluster Management > Create > vSphere
In the cloud-init config, we add a script to extrapolate the ovf environment that vSphere will provide via the Network Profile and configure the underlying OS. In this case, Ubuntu 22.04 using Netplan:
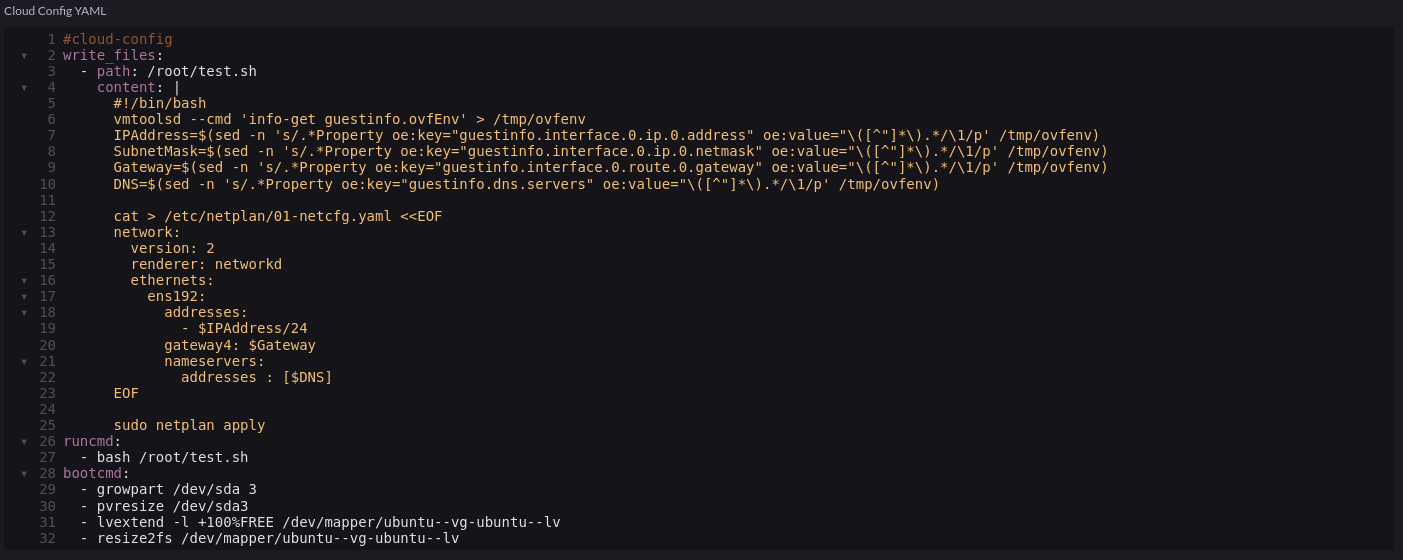
Code snippet:
#cloud-config
write_files:
  - path: /root/test.sh
    content: |
      #!/bin/bash
      vmtoolsd --cmd 'info-get guestinfo.ovfEnv' > /tmp/ovfenv
      IPAddress=$(sed -n 's/.*Property oe:key="guestinfo.interface.0.ip.0.address" oe:value="\([^"]*\).*/\1/p' /tmp/ovfenv)
      SubnetMask=$(sed -n 's/.*Property oe:key="guestinfo.interface.0.ip.0.netmask" oe:value="\([^"]*\).*/\1/p' /tmp/ovfenv)
      Gateway=$(sed -n 's/.*Property oe:key="guestinfo.interface.0.route.0.gateway" oe:value="\([^"]*\).*/\1/p' /tmp/ovfenv)
      DNS=$(sed -n 's/.*Property oe:key="guestinfo.dns.servers" oe:value="\([^"]*\).*/\1/p' /tmp/ovfenv)

      cat > /etc/netplan/01-netcfg.yaml <<EOF
      network:
        version: 2
        renderer: networkd
        ethernets:
          ens192:
            addresses:
              - $IPAddress/24
            gateway4: $Gateway
            nameservers:
              addresses : [$DNS]
      EOF

      sudo netplan apply
runcmd:
  - bash /root/test.sh
bootcmd:
  - growpart /dev/sda 3
  - pvresize /dev/sda3
  - lvextend -l +100%FREE /dev/mapper/ubuntu--vg-ubuntu--lv
  - resize2fs /dev/mapper/ubuntu--vg-ubuntu--lv
What took me a little while to figure out is the application of this feature is essentially a glorified transport mechanism for a bunch of key/value pairs – how they are leveraged is down to external scripting/tooling. VMTools will not do this magic for us.
Next, we configure the vApp portion of the cluster (how we consume the Network Protocol Profile:
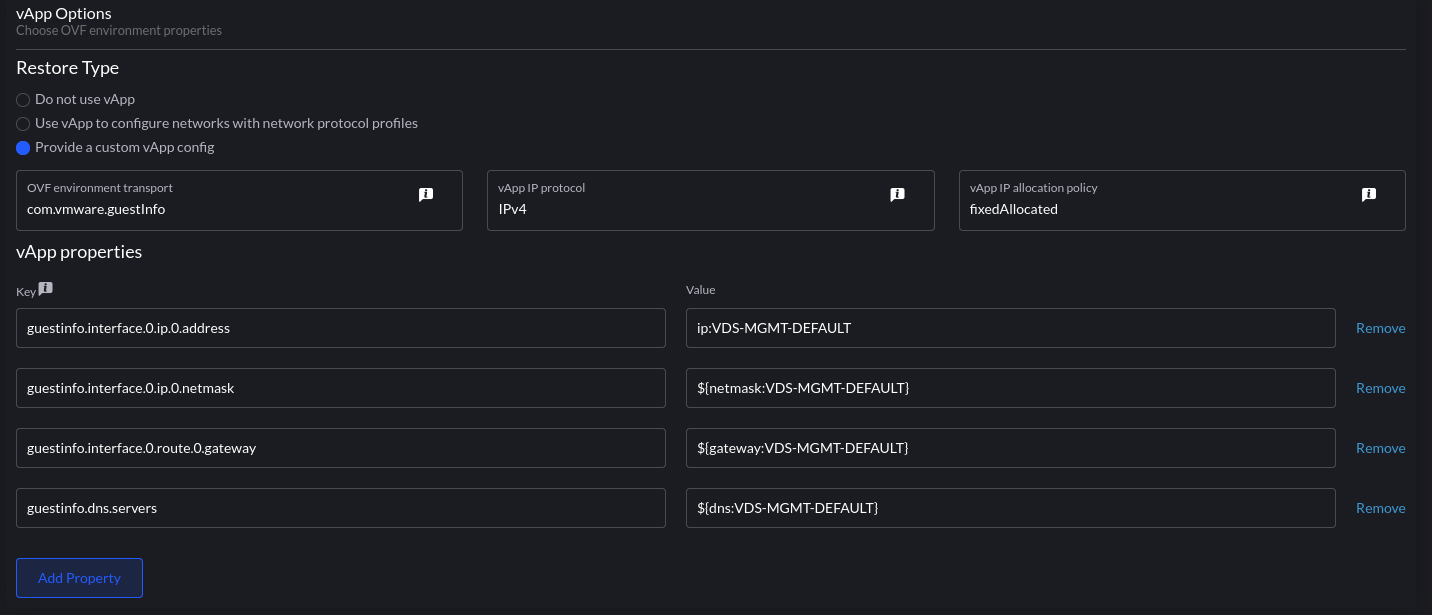
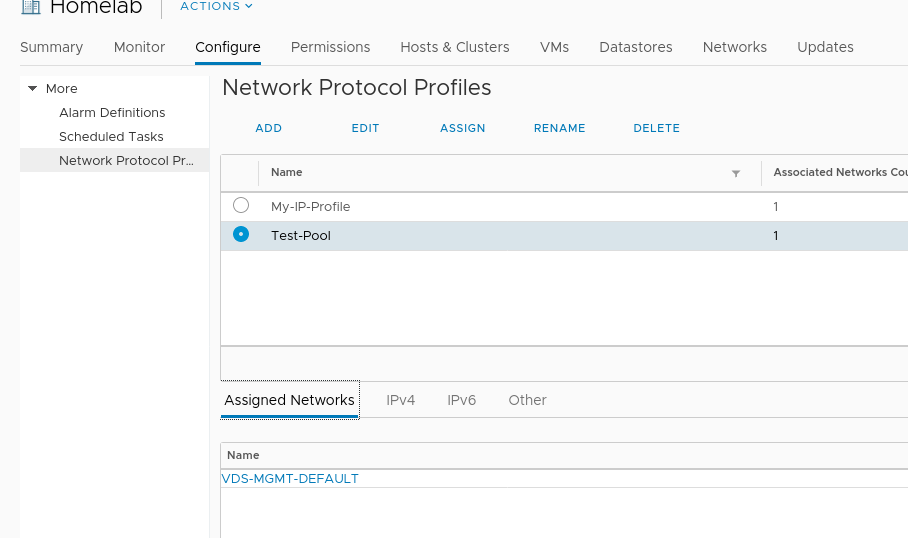
the format is param:portgroup. ip:VDS-MGMT-DEFAULT will be an IP address from the pool we defined earlier – vSphere will take an IP out of the pool and assign it to each VM associated with this template. This can be validated from the UI:
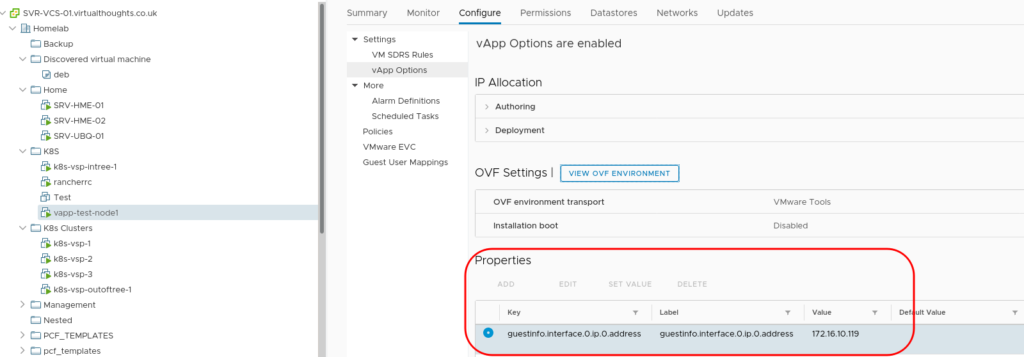
What we essentially do with the cloud-init script is extract this and apply it as a configuration to the VM.
This could be seen as the best of both worlds – Leveraging vSphere Network Profiles for predictable IP assignment whilst avoiding DHCP and the need to implement many Node Templates in Rancher.
I think it’s important to mention that when using the cloud image of ubuntu 18.04, in order for the above to work it is important to disable the cloud-init mode of netplan in advance, as explained in https://graspingtech.com/ubuntu-server-18.04-static-ip/
Good point. The default netplan config could interfere with this.
Followed this document, and while I can see the vApp fields being populated in VCenter, the VM OS never gets anything changed. IPs never get applied. I did the cloud init disable as well.
-Ubuntu 18.04
-VCenter 6.7
Also would be nice to know – how to set the hostname of the guest to the VM name. Tried many attempts, but figure it’s the same issue with the networking not applying from these scripts.
Hi John,
The script above works with netplan. Which Linux distro are you using? You may need to tweak it slightly to match the network manager used in the VM.
Thank you for your reply. I am using https://www.osboxes.org/ubuntu/#ubuntu-1804-vmware – the Bionic Beaver image. If I run your script manually on the image, it applies and works – so I don’t think it’s a script problem, rather an issue getting Vapp properties to apply to Ubuntu. I hear there are issues with VMware customization on Ubuntu distros – but you stated that you did use Ubuntu 18.04 correct? Is there something that has to be done to allow the VMware customization?
Hi John,
The only real requirement is cloud-init and vmtools. The fact you say it works manually implies that vmtools is working as expected. Can you confirm cloud-init is installed?
Correct, the latest apt updates of open-vm-tools and cloud-init are installed on this version of Ubuntu.
Anything to do with the 99-disable-network-config.cfg script? should I remove this? Not sure what else to try. Is there something that needs to be done in Rancher or VMware that might not have been so obvious here?
Hi David – I reached out to VMWare to see if I could get a list of the variables associated with guestinfo. So far I haven’t been successful and haven’t been able to find anything except one obscure API document. Do you happen to have this information you could share to help us add additional functionality here? That would be awesome. Thank you so much for this post. It is great!
Hi John,
Thanks for your kind comments :). My only reference has also been this API document you’ve mentioned.
Solved by disabling VMware customization in cloud-init
Sorry, solved by following VMware KB to set disable_vmware_customizations to false in cloud-init. One final question – is there anyway to set a vApp variable to grab the VM name ? doesn’t look like rancher is changing the cloned template to match the vmname – or this has to be figured out – outside of the vApp?
Good question. Rancher will change the name of the VM but not via cloud-init – it’s done via docker machine and the name is based on the node pool in Rancher. If you’re quick enough to log into the VM quickly after it’s cloned it will have the template name briefly. Give it a minute or so and you should see the name change to match the VM name.
How and where to disable it?
It works for me without disabling VMware customization.
Hi,
This is perhaps a newbie question, but my deploy gets stuck in “Waiting for SSH to be available…” and sadly im not able to see the next logical step.
What can be the cause of this? I have a hunch that it is the ssh key from rancher that is missing in my deploy.
A nudge in the right direction would be very appriciated.
Hi Anders
Few things I would check:
– The VM gets an IP address and is reported in vCenter (Rancher will use what’s reported to SSH into)
– The VM has cloud-init installed
– The VM has cloud-init in a cleared state where it’s ready to accept new keys
– The script above needs adjusting if ens160 is not your VM’s interface name
Hi David, thanks so much for this article. I’m having the same problem and I’m thinking your 3rd point about cloud-init being in a cleared state might be my problem as I’m good on the other points. How do I go about putting “cloud-init in a cleared state where it’s ready to accept new keys”? I’m using the official ubuntu 18.04 cloud image, imported into VSphere and directly converted to a template (it’s never been booted).
Hi Dan,
The cloud image already has cloud-init cleared, so you shouldn’t need to do anything to it. For other templates I run cloud-init clean –logs (clean cloud init and the associated logs)
Does vCenter report the VM having an IP address Rancher can route to? Feel free to join us in #vSphere on the community slack channel https://slack.rancher.io/
Doing this with Rancher 2.4.5 and using Ubuntu cloud image for focal-20.04. It’s working but seems to take a bit for the VM tools to finally show the IP assigned (it shows in the properties immediately, but takes the tools maybe 3 minutes to display it). Rancher unfortunately seems to still timeout waiting for SSH, even though I can SSH successfully using keys written by cloud-init. I want to ensure it isn’t the network conflict issue. I have attempted to use the write_files section of cloud-init to disable cloud-init’s default networking, but that may be happening too late in the boot process. Is there a way to disable without modifying the cloud-image itself?
What is the leasing time to vSphere reuse an IP of a node that was deleted?
What is needed on the VMware-Template side (NoDHCP / Cloud_init_GuestInfo)?
Nothing special. But disabling DHCP will prevent the VM from hanging a bit on startup waiting for an address, which can trip up Rancher under some conditions as VMtools doesn’t present a IPv4 address for some time. Therefore I recommend that.
I recommend actually adding this script into your base image packer exampels.. so then you can simply add a small runcmd in your Node template cloud-init instead of having to maintain this scriptlet in every one of them.
And as helpful as this is, it would be more helpful if it didn’t hardcode /24 into the netplan prefix..
Here is a proper bash only function so that the subnet mask actually works..
IPprefix () {
c=0 x=0$( printf ‘%o’ ${1//./ } )
while [ $x -gt 0 ]; do
let c+=$((x%2)) ‘x>>=1’
done
echo $c
}
Prefix=$(IPprefix $SubnetMask)
Then adjust the heredoc:
addresses:
– $IPAddress/$Prefix
No need to update the template:
write_files:
– path: /etc/netplan/99-disable-network-config.cfg
content: “network: {config: disabled}”
David covers this topic in this part of a Rancher Master Class from earlier this month : https://youtu.be/ozLPpyrqwf8?t=4556 . I recommend watching the entire thing!
David,
Thank you very much for this!
Hi,
To be sure, we only need to have cloud init install on our template, no further configurations are required ?
Then, the script through rancher GUI will interract with cloud init ?
This method (Vsphere network profiles) looks to still be the best method for “assigning” static IP addresses to nodes when using Rancher node templates. I recently redid my vm images for Ubuntu 20.04LTS and on Rancher 2.5.x and came across a problem in that I was using the cloud-init runcmd: section to run the script to setup the static IP, which was a bit too late in the cloud-init process to install packages etc.
The solution is to use the bootcmd: section in my node templates cloud-init file, the bootcmd: section runs fairly early in the cloud-init process and thankfully vmtools looks to still be able to get the info so the network is plumbed fairly early on so package installations work 🙂
Hope this helps.
Greetings,
This approach worked with Rancher 2.5.7 but has stopped working with 2.5.8
vmtoolsd –cmd ‘info-get guestinfo.ovfEnv’ > /tmp/ovfenv
creates an empty file.
Can anyone else confirm?
Have you found a fix or work around?
Thanks,
Doug
Still works for me with 2.5.8
Hi, if anyone reads this in 2023,
it seems to still work with vCenter/ESXi 7+ but there is a typo in the script. It’s guestInfo instead of guestinfo. That’s why Doug got an empty file.
I found this by looking at the OVF Envirnoment via vCenter VM Configure->vApp Options->”View OVF Environment”.
Thank you David, this article helped me a lot in getting it to work without DHCP.
We are using Rancher 2.6.6
Thanks Roland. I’ve used the same script recently and I’ve not had to change guestinfo to guestInfo. Can you tell me a bit more about the environment, please? (OS, vmtools version, etc?)
Perhaps something has changed since I wrote this. I assume this is regarding the line:
vmtoolsd –cmd ‘info-get guestinfo.ovfEnv’ > /tmp/ovfenv
Hey David,
Thank you for your reply.
Yes, for me the output from `vmtoolsd –cmd ‘info-get guestinfo.ovfEnv’ contains Property keys with `guestInfo.interface` instead of `guestinfo.interface’. I don’t know why.
We are using vCenter version 7.0 and I am trying to deploy a ubuntu focal (20.04) from the official cloudimage. vmtoolsd is in version 11.3.0
I got it working for a test cluster, but the second cluster (prod) I tried to provision with a little bit more nodes and on a different datacenter, the provisioning failed. Rancher never got over the “creating server” and “Waiting for viable init node” stage. After some debugging we found that the VM guest tools aren’t running. When starting the open-vm-tools via systemd the provisioning continued and finished. (I assume that rancher was waiting for the VM to get an IP reported from vCenter). Looking at the cloud-init I got from your blog above I realized you intentionally stopped the open-vm-tools in the bootcmd section. What’s the reason for this? Did you modify your template or used other customization to have guest-tools running in the VM?
Cheers,
Roland
Oh nevermind. I got confused and mixed stuff from this blog with the cloud-init from this (https://gist.github.com/PhilipSchmid/b7d7cc31c73c86bc5d4101d57744b1f8) gist. Unfortunately the systemctl stop open-vm-tools caused the issue for me. I guess I won’t need to use this for my case. This solves the second part of my reply above.
Have a great day.
I also found my difference with the vApp property key. It was my mistake, because the VmwarevsphereConfig I deploy to rancher uses `guestInfo` for the vApp Property key. That’s why I had to adapt the sed command in the cloud-init script.
Does this still require a DHCP assigned address at the start of the provisioning for this process to work?
DHCP is not required at any part of the provisioning.
Ubuntu waits for 2 minutes idling during boot, when the network config is disabled.
I just reproduced this with a clean cloud image, when disabling network all together, cloud-init behaviour, or rather default ubuntu behaviour is to wait up to 2 minutes for a valid connection to be up before it actually starts doing `bootcmd` or `runcmd`s.
I haven’t found a way to hook in to the `cloud-init init –local` phase yet, b/c/ that’s the phase where you should render custom network code, but the documentation gives you pretty much nothing.
Did anyone encounter this as well?
Thank you so much for this! It totally worked.