Virtualisation, Storage and various other ramblings.

Category: NSX/SDDC (Page 2 of 6)

PKS, Harbor and the importance of container registries

What are container registries and why do we need them?

A lot of the time, particularly when individuals and organisations are evaluating, testing and experimenting with containers they will use public container registries such as Docker Hub.  These public registries provide an easy-to-use, simple way to access images. As developers, application owners, system admins etc gain familiarity and experience additional operational considerations need to be explored, such as:

  • Organisation – How can we organise container images in a meaningful way? Such as by environment state (Prod/Dev/Test) and application type?
  • RBAC – How can we implement role-based access control to a container registry?
  • Vulnerability Scanning – How can we scan container images for known vulnerabilities?
  • Efficiency – How can we centrally manage all our container images and deploy an application from them?
  • Security – Some images need to kept under lock and key, rather than using an external service like Docker Hub.

Introducing VMware Harbor Registry

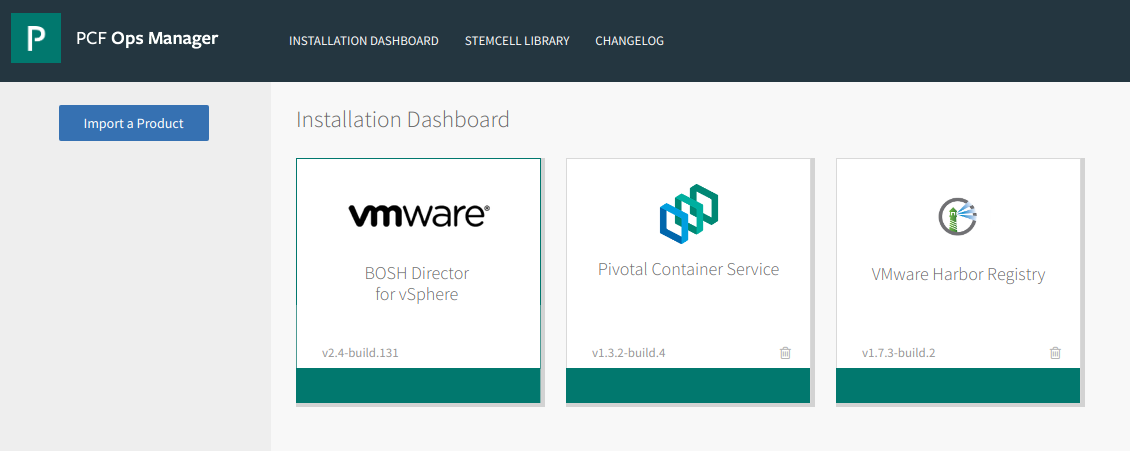
VMware Harbor Registry has been designed to address these considerations as enterprise-class container registry solution with integration into PKS. In this post, We’ll have a quick primer on getting up and running with Harbor in PKS and explore some of its features. To begin, we need to download PKS Harbor from the Pivotal site and import it into ops manager.

After which the tile will be added (When doing this for the first time it will have an orange bar at the bottom. Press the tile to configure).

The following need to be defined with applicable parameters to suit your environment.

  • Availability Zone and Networks – This is where the Harbor VM will reside, and the respective configuration will be dependent on your setup.
  • General – Hostname and IP address settings
  • Certificate – Generate a self-signed certificate, or BYOC (bring your own certificate)
  • Credentials – Define the local admin password
  • Authentication – Choose between
    • Internal
    • LDAP
    • UAA in PKS
    • UAA in PAS
  • Container Registry store – Choose where to store container images pushed to Harbor
    • Local file system
    • NFS Server
    • S3 Bucket
    • Google Cloud Storage
  • Clair Proxy Settings
  • Notary settings
  • Resource Config

VMware Harbor Registry – Organisation

Harbor employs the concept of “projects”. Projects are a way of collecting images for a specific application or service. When images are pushed to Harbor, they reside within a project:


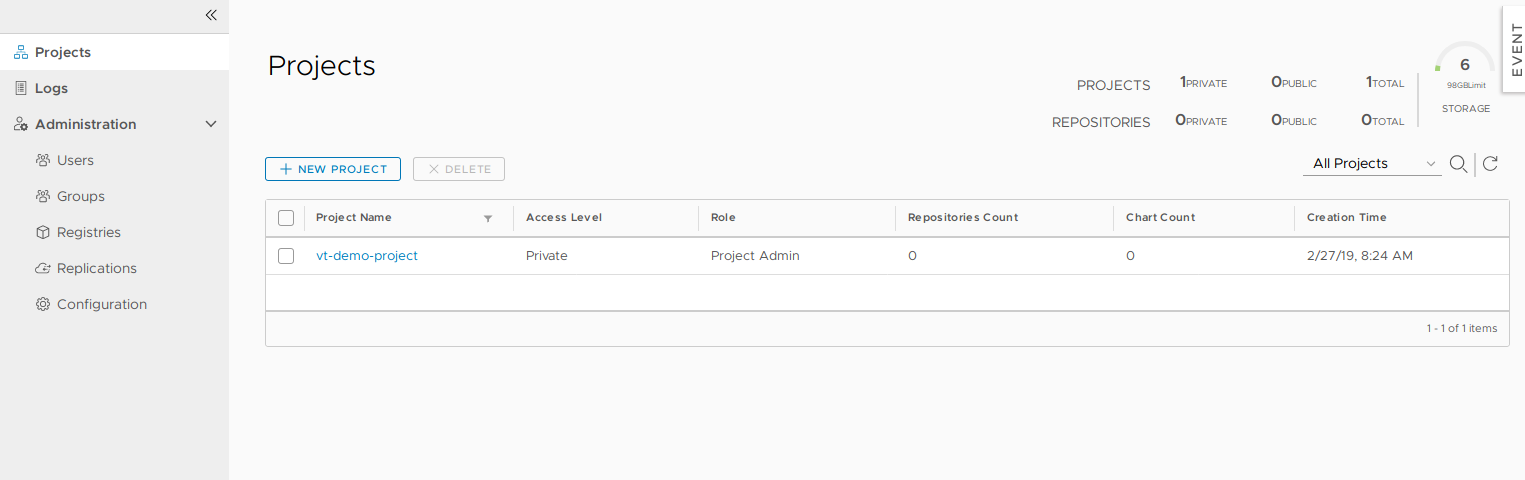
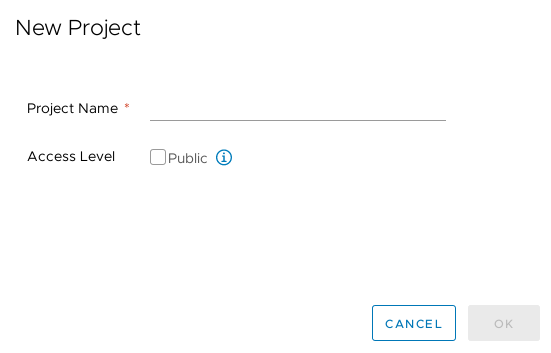
Projects can either be private or public and can be configured during, or after, project creation:

A project is comprised of a number of components:


VMware Harbor Registry – RBAC

In Harbor, we have three role types we can assign to projects:


rbac

Image source: https://github.com/goharbor/harbor/blob/master/docs/user_guide.md#managing-projects

  • Guest – Read-only access, can pull images
  • Developer – Read/write access, can pull and push images
  • Admin – Read/Write access, as well as project-level activities, such as modifying parameters and permissions.

As a practical example, AD groups can be created to facilitate these roles:

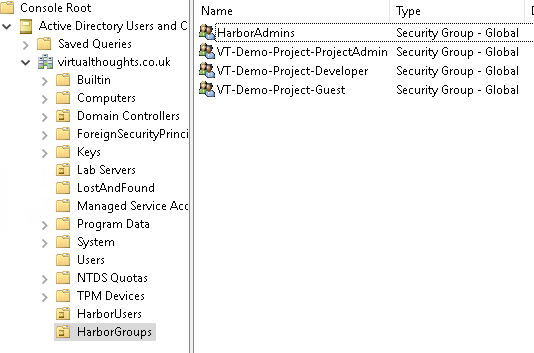
And these AD groups can be mapped to respective permissions within the project


Therefore, facilitating RBAC within our Harbor environment. Pretty handy.

VMware Harbor Registry – Vulnerability Scanning

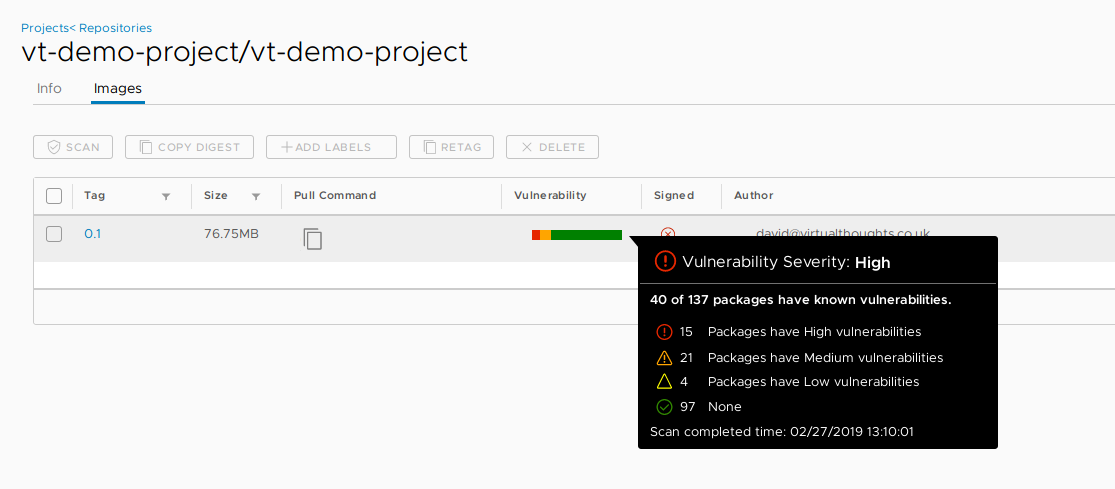
The ability to identify, evaluate and remediate vulnerabilities is a standard operation is modern software development and deployment. Thankfully Harbor addresses this with integration with Clair – an open source project that addresses the identification, categorisation and analysis of vulnerabilities within containers. As a demonstration we need to first push an image to Harbor:

After initiating a scan, Harbor can inform us of what vulnerabilities exist within this container image

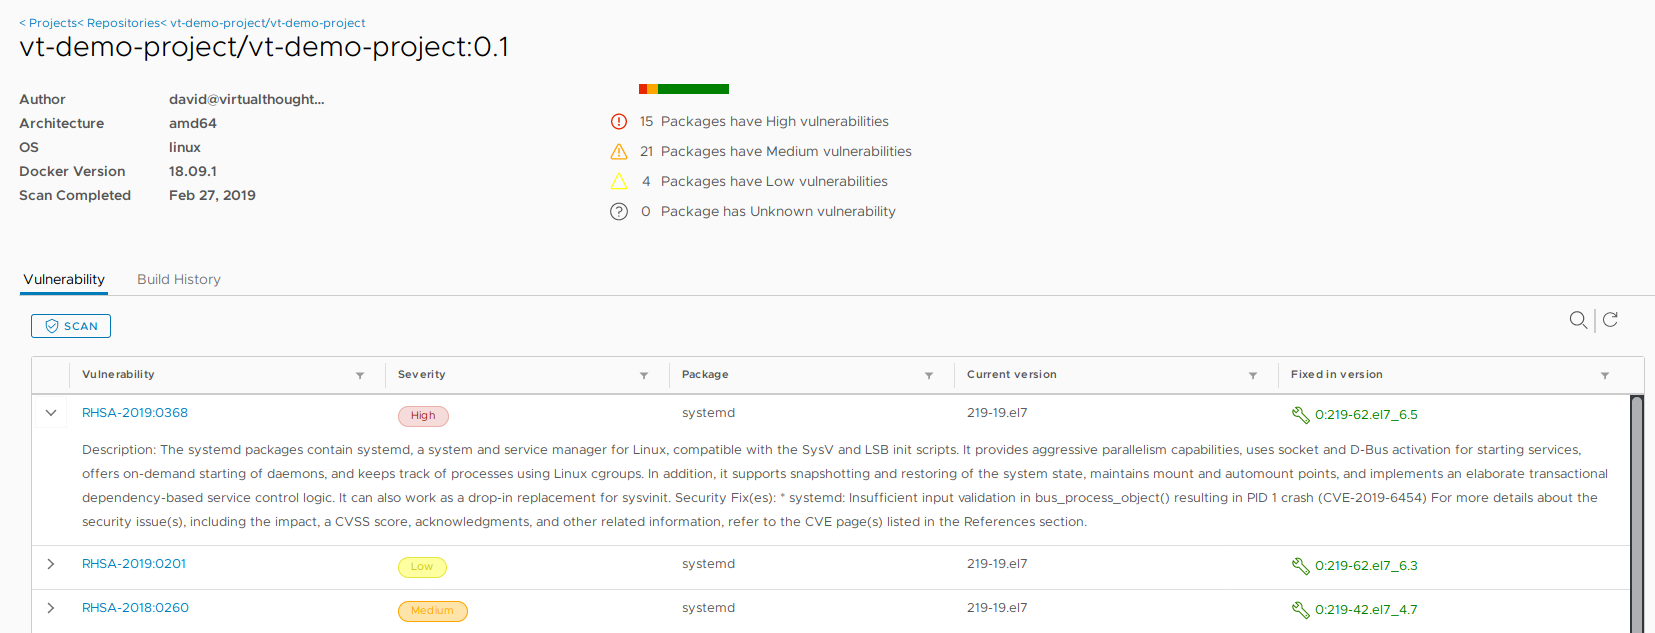
We can then explore more details about these vulnerabilities, including when they were fixed:


Conclusion

Harbor provides us with an enterprise level, container registry solution. This blog post has only scratched the surface, and with constant development being invested into the project, expect more features and improvements.


My VCAP6-NV Experience

Preamble (pun intended)

I’ve been eyeing up the VCAP6-NV exam for quite some time now, but due to work and personal projects I’ve not been able to focus on this exam. Having some time between jobs I decided to start revising and push myself into taking the exam. At time of writing, there is still no NV-Design exam, therefore, anyone who sits and passes the VCAP6-NV Deploy exam is automatically given the VCIX6-NV certification.

VMware Certified Implementation Expert 6 – Network Virtualization

I’m not a full on networking person. Back in the day (~10 years ago) I wanted to be, but the opportunities didn’t exist for me and I consequently went down a generic sysadmin path until ending up where I am today, primarily focusing on SDDC and cloud technologies. There are a lot of people who dive into NSX that do come from traditional networking backgrounds. For me, I found this quite intimidating, however the point is you do not have to be some kind of Cisco God to appreciate NSX, or pass this exam.

Preparation

Read any blog post, forum or reddit post about any VMware-based exam and it won’t take long until someone says something like:

“Read, study, understand and master the contents of the blueprint.”

And it’s absolutely correct. The version of the blueprint for the exam I sat can be found at https://www.vmware.com/content/dam/digitalmarketing/vmware/en/pdf/certification/vmw-vcap6-nv-deploy-3v0-643-guide.pdf

This, as well as vZealand.com’s excellent guide were my primary study resources and I would prepare by doing the following:

  1. Go over each section  of the blueprint via vZealand’s guide in my own lab, following the instructions on the site.
  2. Go over each section of the blueprint without any initial external assistance, assess accuracy after each objective by checking the guide.
  3. Go over each section of the blueprint in a way where I was confident in going over the objectives from practice.

Also, bear in mind the exam is based on 6.2 of NSX, therefore it’s a good idea to have a lab running on this version as there have been a number of significant changes since then.

After I accomplished all three, I felt confident to sit the exam

The exam itself

You’re looking at 205 minutes in total covering 23 questions that cover the blueprint in its entirety. Without breaking NDA my observations are:

  • Time management – This is the third VCAP exam I’ve taken and with each the time has flown by. It really doesn’t feel like a long time when you’ve finished. I personally found the NSX VCAP exam much more demanding on time compared to the VCAP-DCV Deploy exam. I didn’t complete all my questions in the NV exam whereas I had about 30-40mins left when I took the DCV exam.
  • Content – I feel like the exam was a pretty good reflection of the blueprint and was fairly well represented.
  • HOL Interface – The Exam simulation feels very similar to the VMware HOL, including (unfortunately) the latency. The performance for my exam wasn’t great, but wasn’t terrible.
  • Skip questions you’re not sure on – Time is an expensive commodity in this exam, if you’re struggling with some questions skip and move on. You may have time to come back to it later. I skipped a couple of questions.


Result

I passed, but not by much. But a pass is a pass and I was pretty chuffed. It’s definitely the hardest VCAP exam I’ve taken to date.


NSX-T, Kubernetes and Microsegmentation

For the uninitiated, VMware NSX comes in two “flavours”, NSX-V which is heavily integrated with vSphere, and NSX-T which is more IaaS agnostic. NSX-T also has more emphasis on facilitating container-based applications, providing a  number of features into our container ecosystem. In this blog post, we discuss the microsegmentation capabilities provided by NSX-T in combination with container technology.

What is Microsegmentation?

Prior to Software-defined networking, firewall functions were largely centralised, typically manifested as edge devices which were and still are, good for controlling traffic to and from the datacenter, otherwise known as north-south traffic:

The problem with this model, however, is the lack of control for resources that reside within the datacenter, aka east-west traffic. Thankfully, VMware NSX (-V or -T) can facilitate this, manifested by the distributed firewall.

Because of the distributed firewall, we have complete control over lateral movement within our datacenter. In the example above we can define firewall rules between logical tiers of our application which enforce permitted traffic.


But what about containers?

Containers are fundamentally different from Virtual machines in both how they’re instantiated and how they’re managed. Containers run on hosts that are usually VM’s themselves, so how can we achieve the same level of lateral network security we have with Virtual Machines, but with containers?


Introducing the NSX-T Container Plugin

The NSX-T container plugin facilitates the exposure of container “Pods” as NSX-T logical switch ports and because of this, we can implement microsegmentation rules as well as expose Pod’s to the wider NSX ecosystem, using the same approach we have with Virtual Machines.

Additionally, we can leverage other NSX-T constructs with our YAML files. For example, we can request load balancers from NSX-T to facilitate our application, which I will demonstrate further on. For this example, I’ve leveraged PKS to facilitate the Kubernetes infrastructure.

Microsegmentation in action

Talk is cheap, so here’s a demonstration of the concepts previously discussed. First, we need a multitier app. For my example, I’m simply using a bunch of nginx images, but with some imagination you can think of more relevant use cases:

Declaring Load balancers

To begin with, I declare two load balancers, one for each tier of my application. Inclusion into these load balancers is determined by tags.


apiVersion: v1
kind: Service
metadata:
name: web-loadbalancer
  labels:
  namespace: vt-web
spec:
  type: LoadBalancer
  ports:
  - port: 80
    protocol: TCP
    targetPort: 80
  selector:
    app: web-frontend
    tier: frontend
---
apiVersion: v1
kind: Service
metadata:
 name: app-loadbalancer
 labels:
 namespace: vt-web
spec:
 type: LoadBalancer
 ports:
 - port: 8080
 protocol: TCP
 targetPort: 80
 selector:
 app: web-midtier
 tier: midtier
---

Declaring Containers

Next, I define the containers I want to run for this application.

<pre>---
apiVersion: extensions/v1beta1
kind: Deployment
metadata:
 name: web-frontend
 namespace: vt-web
spec:
 replicas: 2
 template:
 metadata:
 labels:
 app: vt-webapp
 tier: webtier
 spec:
 containers:
 - name: web-frontend
 image: nginx:latest
 ports:
 - containerPort: 80
---
apiVersion: extensions/v1beta1
kind: Deployment
metadata:
 name: web-midtier
 namespace: vt-web
spec:
 replicas: 2
 template:
 metadata:
 labels:
 app: web-midtier
 tier: apptier
 spec:
 containers:
 - name: web-midtier
 image: nginx:latest
 ports:
 - containerPort: 80</pre>

Logically, this app looks like this:


Deploying app

david@ubuntu_1804:~/vt-webapp$ kubectl create namespace vt-web
namespace "vt-web" created
david@ubuntu_1804:~/vt-webapp$ kubectl apply -f webappv2.yaml
service "web-loadbalancer" created
service "app-loadbalancer" created
deployment "web-frontend" created
deployment "web-midtier" created


Testing Microsegmentation

At this stage, we’re not leveraging the Microsegmentation capabilities of NSX-T.  To validate this we can simply do a traceflow between two web-frontend containers over port 80:


As expected, traffic between these two containers is permitted. So, lets change that. In the NSX-T web interface go to inventory -> Groups and click on “Add”. Give it a meaningful name.

As for membership Criteria, we can select the tags we’ve previously designed, namely tier and app.

Click “add”. After which we can validate:

We can then create a firewall rule to block TCP 80 between members of this group:

Consequently, if we run the same traceflow exercise:

Conclusion

NSX-T provides an extremely comprehensive framework for containerised applications. Given the nature of containers in general, I think container + microsegmentation are a winning combination to secure these workloads. Dynamic inclusion adheres to the automated mentality of containers, and with very little effort we can implement microsegmentation using a framework that is agnostic – the principles are the same between VM’s and containers.

« Older posts Newer posts »

© 2024 Virtual Thoughts

Theme by Anders NorenUp ↑

Social media & sharing icons powered by UltimatelySocial
RSS
Twitter
Visit Us
Follow Me